Identity Verification App
One of the example apps we’ve built to demonstrate the business problems Buttonize can solve is an app for our identity verification team.
If you work in FinTech, it’s quite common to have users submit documents for identity verification. If your business handles reviewing these documents in-house, this is the perfect time to help out your compliance team and use Buttonize!
Resulting app
The Example on GitHub
The code for this example can be found in our examples repo. Please check it out and get acquainted.
One import thing to note is that in order to use the local development tooling with Buttonize, you must export your CDK app, as can be seen here.
If you don’t plan to use the local development features, then this step is optional.
This guide is very similar to our guide for our example Customer Support App. Reading only one of two is necessary.
IdentityVerificationStack
In this guide, we’ll skip some of the general concepts already covered in the Help Request Form Guide. If you’re new to building apps with Buttonize or haven’t read that guide yet, we recommend doing so.
Anyways, here’s a high level overview of what our identity verification app with all its pages looks like:
new ButtonizeApp(this, 'IdentityVerificationApp') .page('LoadUserPage', { body: [ // ... ] }) .page('DocumentVerificationPage', { body: [ // ... ] }) .page('ConfirmationPage', { body: [ // ... ] })Within each page’s body prop, we then layout what our app should look like and which actions certain components should take
when interacted with.
LoadUserPage (the first page)
In our first page, we provide a form for our compliance team to load the user they’re trying to help into the app. This page is fairly straightforward:
body: [ Display.grid([ { size: 1, body: [ Input.text({ id: 'userId', label: 'User Id' }) ] }, { size: 1, body: [ Input.button({ label: 'Load User', onClick: Action.aws.lambda.invoke( new NodejsFunction(this, 'IdentityVerificationLoadUserLambda', { handler: 'handler', entry: path.join(__dirname, `loadUserHandler.ts`), runtime: lambda.Runtime.NODEJS_20_X }), { Payload: { userId: '{{userId}}' } }, { id: 'loadUserPayload' } ), onClickFinished: Action.buttonize.app.changePage( 'DocumentVerificationPage' ), kind: 'secondary', intent: 'default' }) ] } ])]We simply need an Input.text field where our colleague can enter the user id, and an Input.button component.
In order to get the components to display side-by-side, we’re using Input.grid. If we wanted them stacked vertically,
we could also just do it like:
body: [ Input.text({ id: 'userId', label: 'User Id' }), Input.button({ label: 'Load User', onClick: Action.aws.lambda.invoke(...), onClickFinished: Action.buttonize.app.changePage(...), kind: 'secondary', intent: 'default' })]Also note our use of the kind and intent props in order to style the button. Your intellisense should make it
clear which values are available for this buttons, and you’ll be able to give them the colors and styles you want.
When the button is pressed, it’ll invoke a lamba to fetch the user data. Once it’s done, we’ll be sent to the next page in order to present the data.
import { Handler } from 'aws-lambda'
export const handler: Handler = async (event, context) => {  // Here, you can load the user info from your database  const userId = event.userId  // for this example, we just return hardcoded data  return {    image: 'https://teara.govt.nz/files/d-23817-pc_2.jpg',    rawData:      '{\n  "metadata": {\n    "reason": "Document expiration"\n  },\n  "firstDeposit": false,\n  "country": "NZ",\n  "risk_level": 2\n}'  }}
Since this is just an example, you can see we’re only returning some hardcoded data, but your lambda could fetch the data from anywhere! Anything you can do within a lambda, you can kick off from Buttonize.
Once this lambda returns, we invoke Action.buttonize.app.changePage via the onClickFinished prop of the button
and move on to the specified page.
DocumentVerificationPage (the second page)
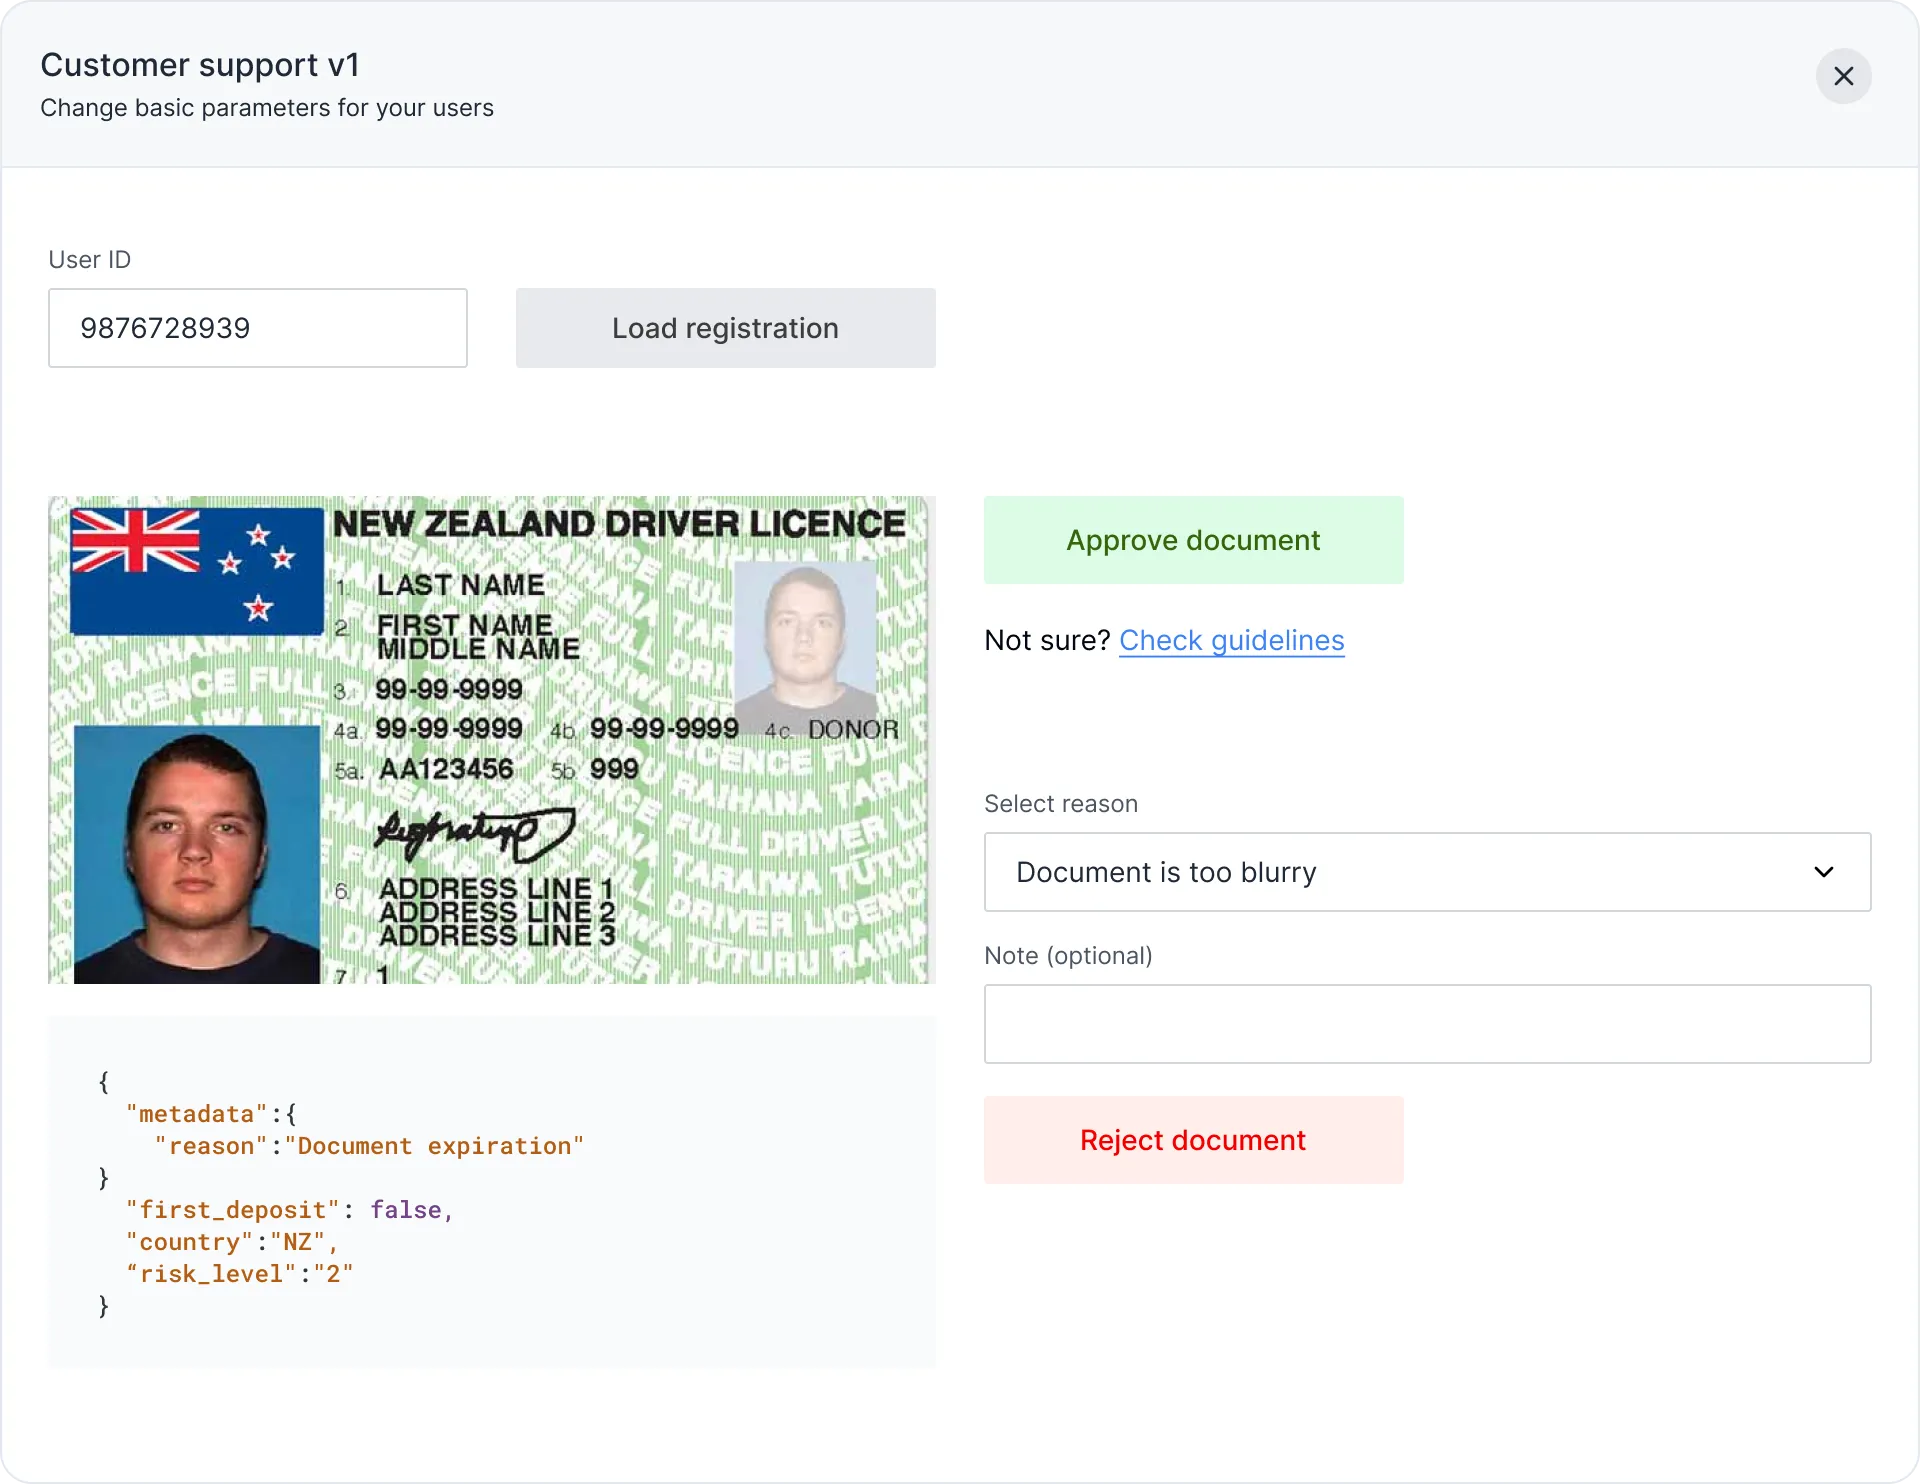
On this page, we display all the info we have on the user, present their documentation, and give the compliance team the ability to approve or reject the document.
The main thing to take note of is that the user data is accessed through the loadUserPayload variable, which
is from the Runtime State, which was populated on the first page via our lamba action.
After the lambda returned, it extracted the data from the response and inserted it into loadUserPayload. Now
we can use that data in order to meaningful context to our page.
body: [ Display.grid([ { size: 2, body: [ Display.image('{{loadUserPayload.image}}'), Display.code('{{loadUserPayload.rawData}}', { language: 'json' }) ] }, { size: 2, body: [ Input.button({ label: 'Approve document', onClick: Action.aws.lambda.invoke( new NodejsFunction(this, 'ApproveDocumentLambda', { handler: 'handler', entry: path.join(__dirname, `approveDocument.ts`), runtime: lambda.Runtime.NODEJS_20_X }), { Payload: { userId: '{{userId}}' } } ), onClickFinished: Action.buttonize.app.changePage('ConfirmationPage'), kind: 'secondary', intent: 'positive' }), Display.text('Not sure? Check guidlines', { spacingBottom: 'lg' }), Input.select({ id: 'reason', label: 'Select reason', options: [{ label: 'Document is too blurry', value: 'too_blurry' }], spacingBottom: 'md', spacingTop: 'lg' }), Input.text({ id: 'notes', label: 'Notes (optional)' }), Input.button({ label: 'Reject document', onClick: Action.aws.lambda.invoke( new NodejsFunction(this, 'RejectDocumentLambda', { handler: 'handler', entry: path.join(__dirname, `rejectDocument.ts`), runtime: lambda.Runtime.NODEJS_20_X }), { Payload: { userId: '{{userId}}', reason: '{{reason.value}}', notes: '{{notes}}' } } ), onClickFinished: Action.buttonize.app.changePage('ConfirmationPage'), kind: 'secondary', intent: 'negative' }) ] } ])]One thing of note is our use of the Display.code component. In this example, it demonstrates presenting some raw json
data we haven’t gotten around to building a UI for. However, such data can still be useful, so why not show it?
Moving on to the interactability, notice how each action invokes a lambda, accessing some data from the Runtime State in order to populate the payload.
Each lambda is just an example, but it should be clear that it’s here where you would insert your business logic.
import { Handler } from 'aws-lambda'
export const handler: Handler = async (event, context) => {  // Here, you can make an API call to handle the approval  const userId = event.userId
  console.log(`User ${userId} document approved`)
  return {    success: true  }}
Notice how userId is the variable we provided in the payload of our action.
Once this lambda returns, the onClickFinished callback is invoked and the flow continues.
ConfirmationPage (the third page)
The code for this is simple since it just displays text, confirming that we approved or rejected this particular user’s documents.
body: [Display.text('User {{userId}} updated')]Notice we’re just using userId, which was actually set in the first page.
In this example, while each button invokes its own lambda, we redirect to the same page via the onClickFinished callback,
but, if desired, you could instead redirect to a discrete confirmation page for each action.
Wrapping Up
That’s about it for this example app. If you’re already familiar with the lambda invoke Action and the change page Action, this should be pretty straightforward.
Hopefully you found this example useful. Now go build something!